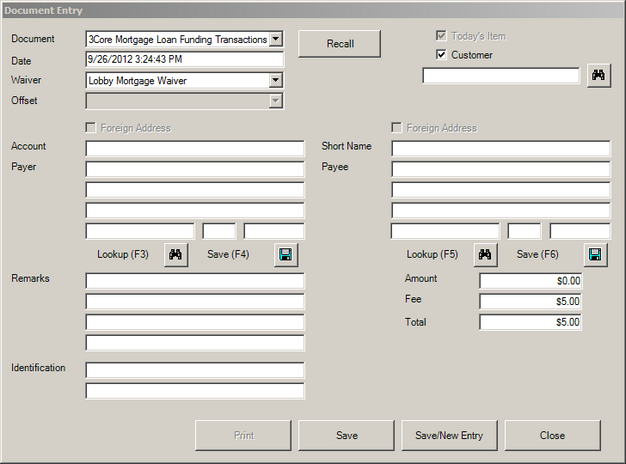
New Document provides entry options for official transactions such as Money Orders, Official Checks, and Cashier's Checks. Each check can be configured to have unique entry requirements ensuring that all the necessary data elements to complete the transaction are entered. Click on areas of the image below for assistance in understanding each field.
 Document Type and Options Document Type and Options
Each type of transaction has can have its own unique set of entry requirements and system configurations. These settings will determine which fields of the Document Entry form get populated. In order to trigger field population, the first selection required is the Document Type.
| 1. | Select the Document type to be processed. Note:The drop-down list will only display document types the operator's assigned user group has access to. |
| 2. | Today's Item will be unavailable if the current time is prior to the. If available, checking it will indicate that this transaction should be considered as part of the current business day's process. This option is usually associated with transactions funded through third party organizations such as MoneyGram. |
| 3. | The Customer checkbox is checked by default. This triggers the Offsets and Waivers that have been configured for bank customers (in the Payer field). If the transaction is for a bank non-customer, uncheck this option to display non-customer waiver and offset options. |
|
Payer Information
Payer information can be looked up and auto-populated into these fields. Alternatively, if this is a new customer, address information can optionally be saved.
To retrieve existing customer information - type partial account number, name, or address information and click the Lookup icon  , or press F3 on the keyboard. , or press F3 on the keyboard.
To enter a new customer's information:
| 1. | In the Account box, enter the payer's account number. (optional) |
| 2. | In the first Payer box, enter the payer's account name. (required) |
| 3. | The next two Payer boxes are for the payer's address. (optional) |
| 4. | The remaining Payer boxes are for the payer's city, state, and zip. (optional) |
| 5. | To save the information click Save icon  , or press F4 on the keyboard. , or press F4 on the keyboard. |
|
Payee Information
Payee information can be looked up and auto-populated into these fields. Alternatively, if this is a new payee, address information can optionally be saved.
To retrieve existing payee information - enter Short Name and a partial name or address information and click the Lookup icon , or press F5 on the keyboard.
To enter a new customer's information:
1. Skip the Short Name box and enter the payee's name in the first Payee box. (required)
2. The next two Payee boxes are for the payee's address. (optional)
3. The remaining Payee boxes are for the payee's city, state, and zip. (optional)
4. To save the information enter a Short Name and then click Save icon , or press F6 on the keyboard.
|
Remarks
Enter remarks to record additional information or notes needed to complete the transaction. Via Document Design, remarks can be configured to print on the document produced. Remark fields can also be reduced in number (one to four boxes) as well as being required/not required for document completion.
|
Identification Information
Identification Fields are used to document customer information used for cash transactions and monetary instruments. If the amount exceeds the Cash/Monetary settings established in Bank Setup, both fields are required to complete the transaction.
To record the ID methods used to verify the transaction, type Identification information in the first and/or second Identification boxes.
|
Completing the Transaction
Once all of the required information is entered, a document can be printed, saved for printing later, saved and a new entry begun, or saved for managerial approval.
| • | Click Save to store the entry and close the New Document window. |
| • | Click Save/New Entry to store the transaction entry and open a blank New Document window to begin a new transaction. |
| • | Click Cancel to close the New Document window and remove information entered. |
Note: Recall will bring back information previously entered except the amount to aid in efficiency for processing multiple like items.
|
|

