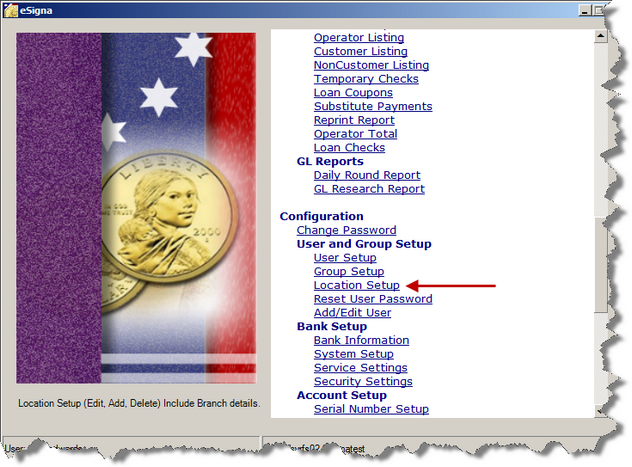
eSigna.Net Help Manual

Location Setup

Location Setup

Previous topic Next topic  

Location Setup

Previous topic Next topic  

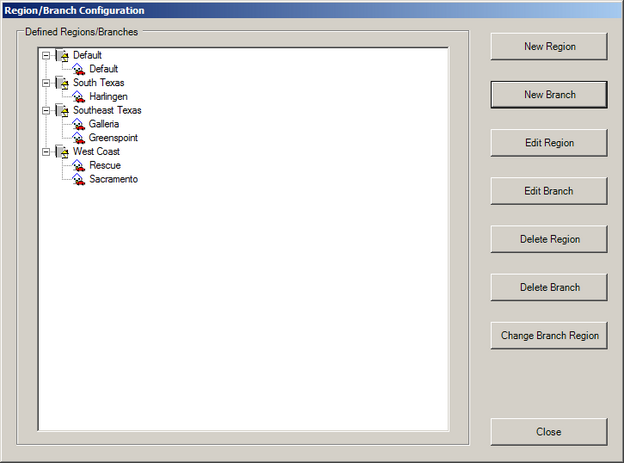
Location assignments allow eSigna to track all transactions to a specific region or branch (physical location).  Branch and Region settings can also be used to trigger specific MICR-encoding unique to a location's process.  Managerial settings also apply to branch and region settings


Create a Region

Regions are at the top of the organizational structure of eSigna.  The highest managerial right is to have multi-region access to user accounts.  Setting up regions in eSigna should follow existing organizational and supervisory structures.


Required

1.Click New Region.
2.Enter a short, descriptive Region Name.


Optional

The Detail fields provide five configurable fields to add additional information for the Region.  Items entered into these fields will remain unique to the region they are associated with.  To change the label, click the Detail name (such as Detail 1) and specify the new label name.


When completed making the required and optional entries for the Region, click OK


Over time Regions may need to be edited or deleted based on internal company changes.

To Edit a Region:


1.Select a Region
2.Click Edit Region
3.Make changes and click OK
4.Click Finish


To Delete a Region:


NOTE: User accounts assigned to a Region that is deleted are reassigned to the Default region.


1.Select a Region
2.Click Delete Region
3.Click Yes to confirm the deletion.
4.Click Finish


Create a Branch

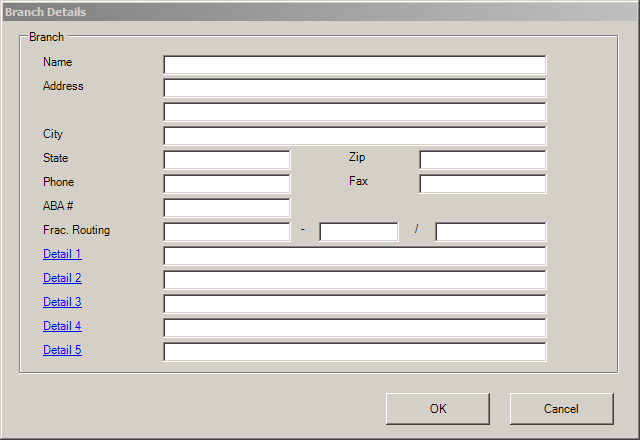
Within a region are branch assignments defining physical locations processing transactions through eSigna. As with regions, managerial settings can also apply to approval options within a single branch or across all branches.


Click to shrink/expand


Required

1.Select the Region (left side list box) that the new branch assignment will be assigned to.
2.Click New Branch
3.Enter a Branch Name
4.Address
5.Enter the City, State, and Zip


Optional

Enter a Phone and/or Fax number(s) for the branch or key contact.
Enter the 9 digit ABA, or routing number associated with the branch.
Enter the Fractional Routing number associated with the branch.
The Detail fields provide five configurable fields to add additional information for the Region.  Items entered into these fields will remain unique to the region they are associated with.  To change the label, click the Detail name (such as Detail 1) and specify the new label name.


When completed making the required and optional entries for the Branch, click OK


Branches may need to be edited or deleted based on organizational changes.  If a branch with user accounts assigned is deleted, the user accounts will be reassigned to the Default branch of the Default region.


To Edit a Branch:


1.Select a Branch
2.Click Edit Branch
3.Make changes and click OK
4.Click Finish


To Delete a Branch:


1.Select a Branch
2.Click Delete Branch
3.Click Yes to confirm delete
4.Click Finish


Reassign a Branch to a Different Region

When a branch needs to be assigned to a different region, follow the steps below.     Note:  All users assigned  to the branch will move under the new region assignment.


To Reassign A Branch:


1.Select a Branch.
2.Click Change Branch Region
3.Select a new Region assignment.
4.Click OK