Configure default values for commonly used Services and Documents to enhance the speed and accuracy of document creation.
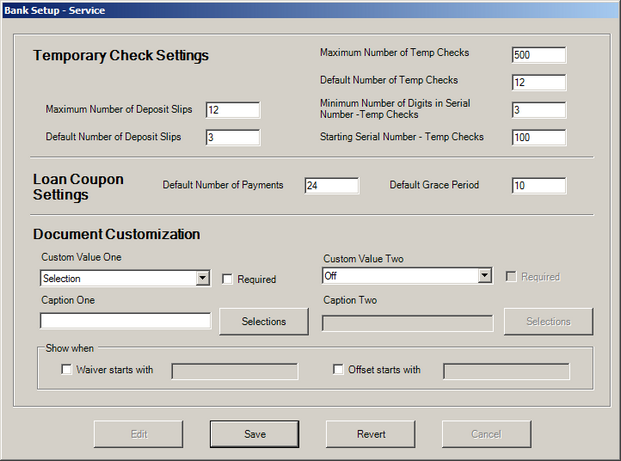
 Temporary Check Settings
Establish default values for several fields in the Temporary Checks service.
| • | Click Edit to enable changes. |
| • | Enter a Maximum Number of Deposit Slips - Limits the total number of deposit slips a user can print per request. |
| • | Enter a Default Number of Deposit Slips - Pre-populates the deposit slip entry form to reduce the input required to complete a deposit slip. Note: There are four temporary checks per page so the value entered here should be divisible by four. |
| • | Enter a Maximum Number of Temp Checks - Limits the total number of temporary checks a user can print per request. |
| • | Enter a Default Number of Temp Checks - Sets the default number of temporary check disbursements. Note: There are four temporary checks per page so the default value should be divisible by four. |
| • | Set a Minimum Number of Digits of Serial Number (Temp Checks) - Enter a value to set the minimum serial number length. |
| • | Specify a Starting Serial Number (Temp Checks) - Enter a number, such as 101 or 1001 to set the default value for the starting serial number. |
|
Loan Coupon Settings
Establish default values for several fields in the Loan Coupon service.
| • | Click Edit to enable changes. |
| • | Default Number of Payments – Sets the default number of loan payments. Note: There are four loan payments per page so the default value should be divisible by four. |
| • | Default Grace Period – Sets the standard grace period for all loan documents. |
|
Document Customization
Two additional fields can be configured to be displayed on the Document Entry form. These custom fields can be configured to allow free text entry, select from a predefined list, or to validate for numeric entry.
| 1. | Click Edit to enable changes. |
| 2. | Select the type of custom value from the Custom Value One drop-down list box; Selection, Numeric or Free Text. |
| 3. | Enter a Caption to identify the custom field. |
| 4. | If Selection is chosen in Step 1 |
| b) | Click Selections and populate the drop-down list box selections. |
| 5. | By default the custom fields will show. Alternatively, choose Show When options if the custom fields should trigger based on a specific waiver or offset code selection. |
| 6. | Repeat for Custom Value Two if necessary. |
|

