Part of the document type creation process involves associating the document type with an underlying Payable Account. Payable accounts are configured via the Serial Number Setup screen. Additionally, serial number ranges are configured and assigned to Payable Accounts from here. Serial number ranges can only be associated with a single payable account. However, a payable account may have multiple/variable serial number ranges. That is to say, a single serial number range can only be associated with a single payable account - though serial number ranges (for each payable account) can overlap and/or be duplicated. For clarification, here is an .
Overview of the process:
1) Create Payable Accounts
2) Create Serial Number Ranges and associate them with Payable Accounts
3) Create Documents and associate them with Payable Accounts
 Creating a Payable Account
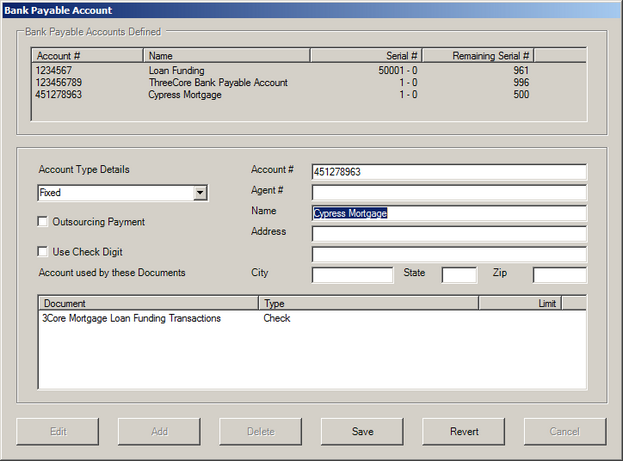
From the Serial Number setup screen, click Payable Accounts.
Required
| 2. | Account # - Enter the payable account (general ledger account) number. |
| 3. | Name - Enter a short descriptive name for the payable account. |
| 4. | Account Type Details - by default a Fixed serial number range is selected. The ranges can be defined as follows: |
| • | Fixed - a single fixed primary and backup serial number range. |
| • | Branch SN - eSigna can associate the branch/accounting unit with the serial numbers each produced. |
| • | Preprinted SN - predefined check numbers. |
| 5. | Click the Outsourcing Payment checkbox if the payable account represents a document outsourced through a third-party vendor such as Travelers Express Moneygram or Integrated Payment Systems. |
| 6. | Click the Use Check Digit checkbox if the serial number requires a check digit calculation. |
Optional
| 1. | Agent # - This number is usually associated with Integrated Payment System (IPS) accounts. |
| 2. | Enter a complete Address with City, State, and Zip information. |
Editing/Deleting a Payable Account
All fields available during the creation of a payable account can be edited.
Note: Any edits to a payable account will affect document types having the payable account assigned.
| 1. | Highlight the payable account in the list box and click Edit. |
To Delete a Payable Account:
Caution: When deleting a payable account, any document types associated with the payable account will be invalidated and will not become valid until the document has been edited to have a valid payable account assigned.
| 1. | Highlight the payable account in the list box and click Delete |
| 2. | Click OK to confirm the deletion or Cancel to leave the account active. |
|
|
|
Assigning Serial Number Ranges
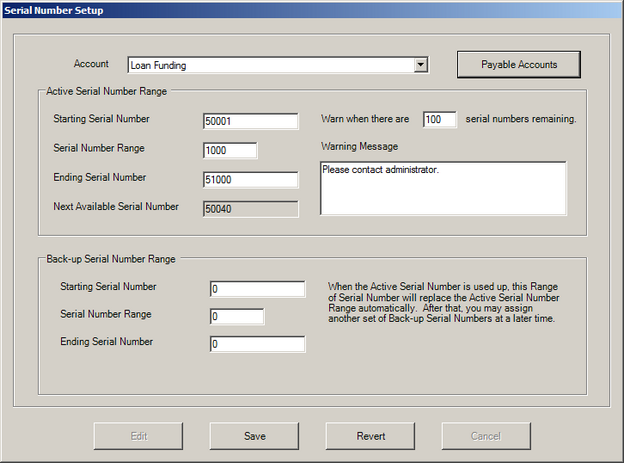
Assign both active and backup serial number ranges for each Payable Account. A serial number range cannot be assigned to multiple payable accounts; that is, multiple payable accounts cannot pull numbers from the same serial number pool/range.
A warning message is required to prompt users that the active range is nearing the last available serial number. The message will continue to appear until a backup range is entered. Once the active range has been depleted, the backup range will become the active range. This process eliminates any pause in work flow or the printing of checks.
| • | Account - Select a Payable Account from the list box |
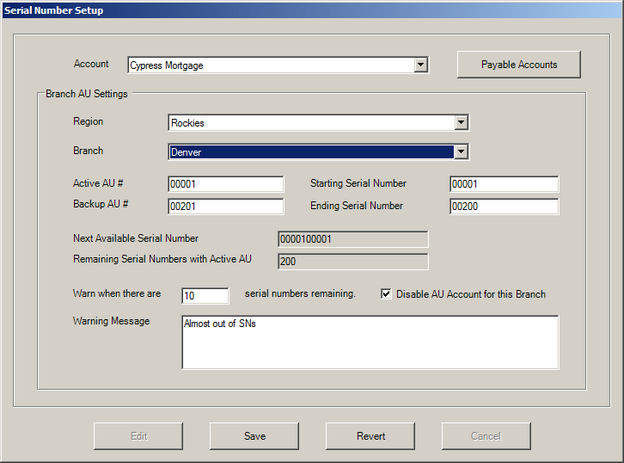
| • | Enter the primary branch/Accounting Unit prefix to associate with the serial number range for each Region/Branch |
| • | Disable AU Account for this Branch - check to disable check issuance for these serial numbers at this branch. |
|
| • | Enter the Starting Serial Number, Serial Number Range, and Ending Serial Number. NOTE: These fields are validated. |
| • | Warn when there are - This value represents the threshold below which the operators should be warned about the depletion of existing serial numbers. |
| • | Enter a Warning Message instructing the user what to do about reaching the serial number threshold. Example: Contact the eSigna administrator. |
| • | In the area for the Backup Serial Number Range, type the Starting Serial Number, Serial Number Range, and Ending Serial Number. |
|